Applies To: ThreatSync+ NDR
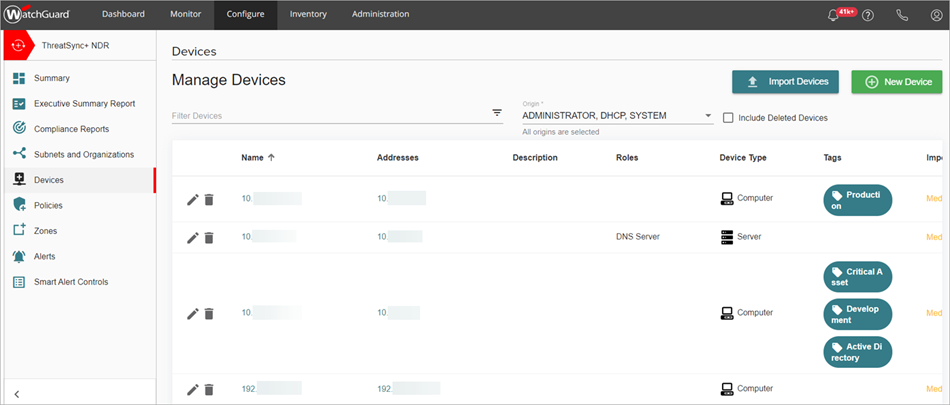
On the Manage Devices page, you can view a list of all devices in your network. This list includes devices detected automatically by ThreatSync+ NDR, and those you add manually.

The device list shows these columns:
- Name — Device name. Click the name to view device details.
- Addresses — IP addresses of the device. The device might have multiple IP addresses for different network interfaces. Click the IP address to view device details.
- Description — Description you enter for the device.
- Roles — Role you assign to your device to describe the role the device serves on your network. For example, a SQL database server.
- Device Type — The type of device. For example, a computer, server, or gateway.
- Tags — Tags you define and apply to organize your devices.
- Importance — Rating you assign to indicate how valuable this device is to your organization. The importance level should reflect the impact to your organization if this device is damaged or lost. This value is used to calculate the risk level of an asset in conjunction with the advanced threat detection of ThreatSync+ NDR.
- Origin — Origin of the information ThreatSync+ NDR has about the device. For example, traffic logs by the System, DHCP logs, or manual Administrator configuration. Devices that you add manually are labeled Administrator.
To customize which devices show on the Manage Devices page, you can use filters to filter devices by their origin, and select whether to include deleted devices in your filters. Keyword searches are case sensitive and must match how the word appears in the device list.

View Device Details
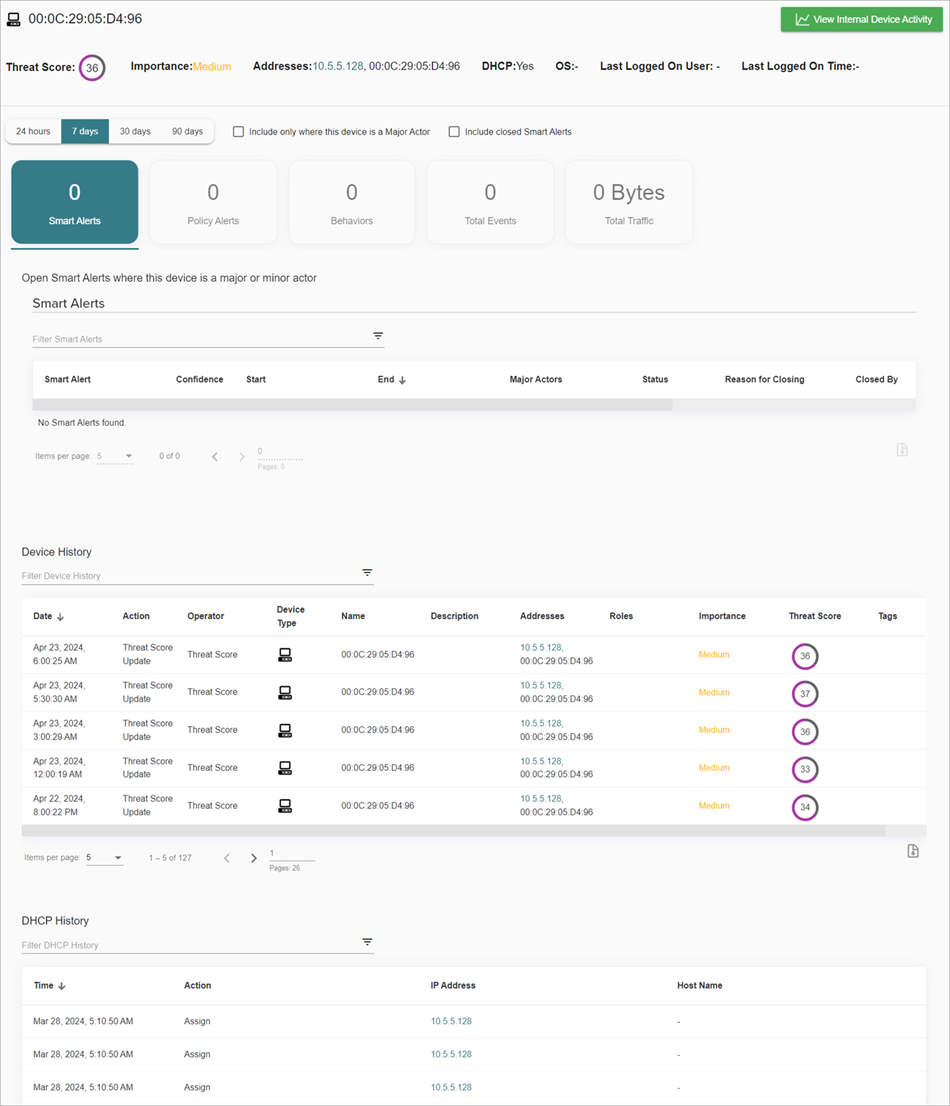
On the Device Details page, you can view detailed information about a device, device history, and traffic details that enables you to perform a deeper investigation into activity on your network.
The Device Details page includes these details:
- Open Smart Alerts where the device is a major or minor actor
- Policy alerts associated with the device
- Smart Alert behaviors associated with the device
- Total events related to the device
- Total traffic to and from the device
- Device history
- DHCP history
To view device details:
- Log in to your WatchGuard Cloud account.
- Select Configure > ThreatSync+ NDR > Devices.
The Manage Devices page opens. - Click the name or IP address of a device you want to view details for.
The Device Details page opens with the Smart Alerts tab selected by default.

- To view details about device traffic on the Traffic page, click View Internal Device Activity. For more information, go to Investigate ThreatSync+ Traffic.
Add a New Device
When you first set up ThreatSync+ NDR, it can take two to three days for assets to show on the Discover page. You might want to manually add devices or import critical assets from your asset management systems to monitor traffic.
For more information about the Discover page, go to ThreatSync+ NDR Asset Discovery.
To add a new device, from WatchGuard Cloud:
- Select Configure > ThreatSync+ NDR > Devices.
The Manage Devices page opens. - Click New Device.
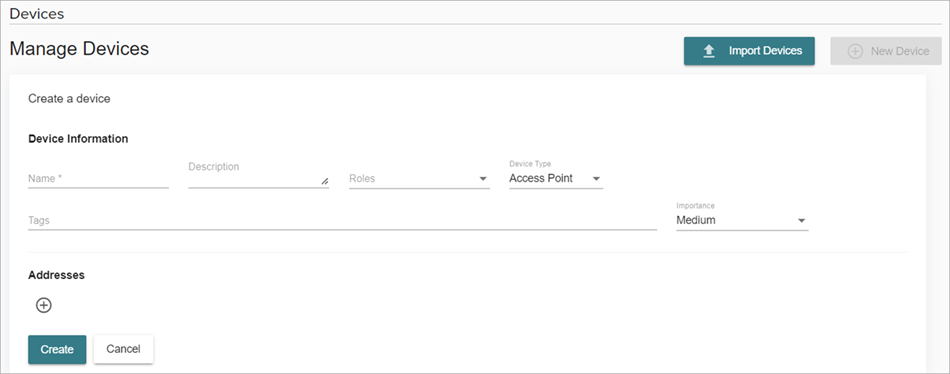
The Create a Device section opens.

- In the Name text box, enter a name for the device.
- (Optional) In the Description text box, enter a description for the device.
- From the Roles drop-down list, select one or more roles for your device.
- From the Device Type drop-down list, select the type of device.
- In the Tags text box, enter a tag name and press enter. You can add multiple tags to each device.
- From the Importance drop-down list, select a value that indicates how valuable this asset is to your organization.
- (Optional) To add another IP address for your device, in the Address section, click
 .
. - Click Create.
Import Devices
You can import details for one or more devices from a .CSV file.
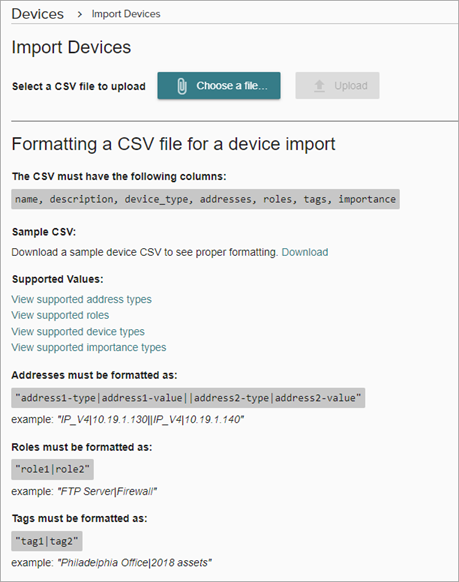
To import the devices, the CSV file must have these columns:
- name
- description
- device type
- addresses
- roles
- tags
- importance
For more information on supported data for the import file, go to Supported Device Import File Values.
To import devices from a .CSV file, from WatchGuard Cloud:
- On the Manage Devices page, click Import Devices.
The Import Devices page opens.

- To view an example of a device .CSV file with supported format, in the Sample CSV section, click Download.
- Click Choose a file.

- Select the .CSV file you want to import.
- Click Upload.
The Import Devices page opens and shows a list of devices from the .CSV file. - To import the devices, click Accept.

Supported Device Import File Values
These values are supported for the device import file:
- Address Type
- IP_V4
- Roles
- Active Directory Server
- Backup Server
- DHCP Server
- DNS Server
- Domain Controller
- Exchange Server
- File Server
- Firewall
- FTP Server
- IMAP Mail Server
- IMAP/SSL Mail Server
- LDAP Server
- LDAP/SSL Server
- NFS Server
- Oracle Database Server
- POP3 Mail Server
- POP3/SSL Mail Server
- Proxy Server/Edge
- Remote Desktop Services
- SCVMM
- Secure Web Server
- Security Server
- SMTP Mail Server
- SMTP/SSL Mail Server
- SQL Database Server
- SSH Server
- Telnet Server
- Web Server
- WSUS Server
- Device Types
- Access Point
- Application Server
- Cluster
- Cluster SAN Fabric
- Computer
- Database Server
- Domain Controller
- Email Gateway
- End-User Computing
- Firewall
- Gateway
- Network
- Network Attached Storage
- Network Switch
- Printer
- Proxy Server
- Router
- Server
- Storage Device
- Switch
- Virtual Desktop
- VPN Server
- Wireless Access Point
- Importance Types
- Very Low
- Low
- Medium
- High
- Very High
Address Format
Addresses must use this format:
"address1-type|address1-value||address2-type|address2-value"
For example: "IP_V4|10.19.1.130||IP_V4|10.19.1.140"
Role Format
Roles must use this format:
"role1|role2"
For example: "FTP Server|Firewall"
Tag Format
Tags must use this format:
"tag1|tag2"
For example: "Philadelphia Office|2018 assets"
Edit a Device
To edit a device:
- On the Manage Devices page, click
 next to the device you want to edit.
 - You can edit these fields:
- Device Name
- Address
- Description
- Role
- Device Type
- Tags
- Importance
- Click
 to save your edits.
It can take up to one hour for changes to the device properties to show in the device list.
Delete a Device
To delete a manually added device, select ![]() next to the device you want to delete.
next to the device you want to delete.
You can only delete devices you add manually. You cannot delete devices detected automatically by ThreatSync+ NDR. After 45 days, devices detected by ThreatSync+ NDR that are removed from your network or have been changed or moved no longer appear in the device list.